Stair Installation (Bull Nose) –Cork Floating Flooring
Tools and materials required:
![]() Tape measurer
Tape measurer
![]() Pencil
Pencil
![]() Saw (circular, table or hack)
Saw (circular, table or hack)
![]() Drill with small or finishing bit (electrical or hand held)
Drill with small or finishing bit (electrical or hand held)
![]() Polyurethane Commercial Glue (tube with “gun” or bucket with narrow roller or brush)
Polyurethane Commercial Glue (tube with “gun” or bucket with narrow roller or brush)
![]() Enough Floating flooring to complete the installation
Enough Floating flooring to complete the installation
![]() Stair nosing – enough to account for linear footage + 10% overage
Stair nosing – enough to account for linear footage + 10% overage
![]() Finishing nails or screws (one size bigger than drill bit)
Finishing nails or screws (one size bigger than drill bit)
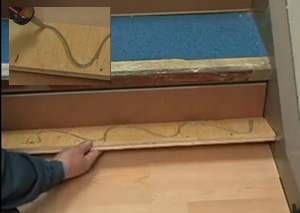
The installation described is for traditional “bull nosing” using a glue or adhesion method to anchor the flooring to the tread. This method describes applying flooring to both the tread and the rise (thus becoming “the riser”).
1. Check with local building codes to ensure your project conforms to building and safety regulations (ie. Flush stair nosing vs. overlapping or “Bull nosing”).
2. The tread of the stair is not allowed to move. This means your floating flooring must be anchored to the stair tread (using glue/adhesive, staples, nails or screws).
3. Inspect your stair treads. They must be sound (no rot or cracked boards, no holes or gaps in the tread), flat (not on a slant), no visible wear pattern on the tread and must be clean (no paint, old adhesives, etc) to allow for full adhesion.
4. To begin installation you must finish the flooring up to the bottom of your staircase while still maintaining the expansion gap up to the base of the first stair.
5. When installing your flooring on the stairs, you will not require underlayment nor poly sheeting (if being used underneath your flooring). You will not need to account for expansion of your flooring on the tread as you will be gluing your flooring directly to the tread (the floor will not be able to expand, therefore it does not require an expansion gap).
6. You will need to “square off” the tread overlap of your stair. You can do this in two ways: 1) You can cut or trim the tread to lay flush with your rise, or 2) you can “fill in the gap” by applying your flooring to the rise (thus it becomes “the riser”). This description involves attaching flooring to the rise (filling in the gap instead of trimming off the edge). 
You will always install the riser (the vertical surface of the stair) before you install the tread. And always remember to cut off the “tongue and groove” of your cork flooring prior to measuring the plank. If your measurements require more than one plank to complete a tread or riser (especially true if you are using a bevelled edge or narrow plank installation), then you will be required to assemble enough flooring planks to accomplish the amount of square footage.
7. Measure from the floor to the top of the riser (the level of the tread).
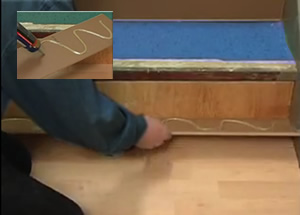
8. Cut a piece of flooring to match the height of your riser (always remove tongue and glove before cutting a plank to match your measurements). Liberally apply the commercial glue to the back of the plank(s) and press the flooring in place against the rise.
9. Measure your tread – remember to allow for the stair nosing. Subtract the measurement of the nosing from the tread depth and cut plank(s) to the adjusted measurement.
10. Apply glue to back of flooring (same application as for the riser) and press firmly into place on the tread of the stair.  Ensure that the front of the stair has been left with a gap that is appropriate for the size of the nosing.
11. To install the stair nosing, measure the length of your tread (and the length of all the treads) and cut your nosing to fit – remember to number your nosing if the lengths differ from one tread to another!
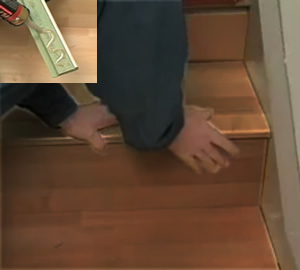
12. Apply the adhesive to the back of the nosing (only applying glue to the surface area that will come in direct contact with the stair tread, not the flooring) and press firmly into place. 
13. Pre-drill pilot holes in the stair nosing (not the flooring) every 8-10 inches (20-25cm). Hammer in the nails (or screw down the screws) into the pilot holes (making sure the nails or screws are flush or counter sunk below the surface of the nosing) to ensure the nosing is anchored to the stair surface. 
14. Continue finishing each stair in the same manner (riser first, tread second, stair nosing third) until you reach the top of the stairs or to the first landing.
15. When installing on a landing/top of the stairs, you will return to a “floating floor” installation method. You will not anchor the flooring in place, but you will still need to anchor (glue and nail/screw down) the nosing. Measure the size of the landing (minus the nosing edge and the 1/2inch expansion gap) and install underlayment and/or poly sheeting (if used in the regular flooring install). 
16. To ensure you leave enough space for the nosing, you will be required to mark a “starting point”. Using a scrap piece of nosing, place the nosing over the edge of the stair/landing. Make a mark where the nosing edge (the edge that is in contact with the stair/landing’s surface) meets the flooring. This is your “Starting point”.
17. From the “Starting Point” measure ½ inch “inwards” from the walls of the landing. This mark is the “maximum edge” of your flooring (the expansion gap).
18. Prepare your first plank by cutting it to size. Remember to deduct the amount for the expansion gap (on either end of the plank) as well as trimming off the “tongue” edge of the plank. Lay plank (trimmed edge facing lip of the stairs) up against the “starting point” and place the shims against the walls. Continue the regular installation of your flooring.
19. Finish the landing by installing the last pieces of trim. Apply adhesive to the final piece of nosing and press into place.
20. Drill pilot holes in the nosing every 8-10 inches (20-25 cm) for the finishing nails/screws. Your nosing and stair edging are now complete.
21. Finish the rest of the landing by removing the spacers/shims. If you laid poly sheeting, trim back the plastic that was run up the wall and install your moulding.
Reminder: Your floor mouldings should only be anchored to the wall, never to the flooring. Once you have glued all of your stairs it is recommended that you refrain from using the stairs for 24 hours or until the manufacturer’s recommend time has elapsed to effect a full cure (let the glue set and harden).
How to Order
- Ordering Free Sample
- Ordering by Email
- Order Online
Shipping Info
- Pick-up Locations
Contact Info
Tel: 1-604-207-0661
Tel: 1-604-207-9541
Toll Free:
1-877-998-1198
1-866-998-1198
Fax: 1-866-373-6520
Showroom and Warehouse Address:
Cancork Floor INC
#185-1991 Savage Rd.
Richmond BC, V6V 0A4
Canada
About Cork
- Cork Floor Case Study
- Additional Inforemation
Categories
Helpful Links
- Installation
- Measurements and Maintenance
Information
- Info
- Product Information
